It’s 9 PM on a Tuesday, you’re craving something sweet, and the thought of preheating an oven makes you want to crawl into bed instead. Sound familiar? The beauty of no-oven desserts is that they deliver all the satisfaction of traditional baked goods without the wait, the heat, or the complicated techniques. In just minutes, you can create impressive treats that taste like you spent hours in the kitchen.
Whether you’re dealing with a broken oven, trying to keep your kitchen cool during summer, or simply don’t have the patience for traditional baking, these quick dessert techniques will transform how you think about homemade sweets. From creamy mousses to decadent chocolate treats, no-oven desserts prove that sometimes the best results come from the refrigerator, not the oven.
Why No-Oven Desserts Are Game-Changers
The traditional baking process can feel like a commitment. You need to preheat the oven for 10-15 minutes, bake for another 20-45 minutes, then wait for everything to cool before you can even think about eating. That’s easily an hour or more from start to finish. No-oven desserts flip this script entirely.
Most no-bake treats come together in under 15 minutes of active work. Sure, some need chilling time in the refrigerator, but that’s passive time where you’re free to do whatever you want. You’re not standing guard, checking for doneness, or worrying about overbaking. The fridge does the work while you relax, answer emails, or binge your favorite show.
Beyond the time savings, these desserts are incredibly forgiving. Traditional baking requires precision – the wrong oven temperature or an extra minute of baking time can ruin a delicate cake or cookies. No-oven desserts typically involve simple mixing, layering, or setting, which means there’s much less room for error. If you’ve ever felt intimidated by baking, this is your entry point.
There’s also the practical advantage of keeping your kitchen cool. During summer months, running an oven can make your entire home uncomfortably warm and drive up your energy bills. No-bake dessert techniques let you satisfy your sweet tooth without turning your kitchen into a sauna.
Essential Ingredients for Quick No-Oven Desserts
The secret to having dessert ready in minutes is keeping a well-stocked pantry. Unlike traditional baking that might require specialty flours, leavening agents, and precise measurements, no-oven desserts rely on a smaller arsenal of versatile ingredients.
Heavy cream becomes your best friend in the no-bake dessert world. It whips into clouds of mousse, creates silky ganaches, and adds richness to countless treats. Keep a carton in your refrigerator, and you’re always minutes away from something spectacular. Cream cheese is equally valuable – it’s the foundation for no-bake cheesecakes, creamy pie fillings, and frosting-style toppings.
Quality chocolate is non-negotiable. Since you’re not baking these desserts, the chocolate flavor takes center stage. Invest in good chocolate chips or bars – the difference between mediocre and excellent chocolate is stark when it’s the star ingredient. Dark, milk, or white chocolate all work beautifully, depending on your preference.
Cookies and graham crackers serve as instant crusts. Crush them up, mix with melted butter, press into a pan, and you have a crust without any baking required. Keep a box of graham crackers and a package of Oreos on hand, and you’re ready for most no-bake cheesecake or pie recipes.
Sweetened condensed milk might seem old-fashioned, but it’s a powerhouse in no-oven desserts. This thick, sweet ingredient creates fudgy textures and adds sweetness and creaminess simultaneously. A single can can transform into magic bars, truffles, or the base for numerous layered desserts.
The Power of Gelatin and Agar
Setting agents like gelatin or agar-agar allow you to create structured desserts without heat-based setting. Gelatin gives you everything from panna cotta to mousse cakes with defined layers. Agar works similarly for plant-based desserts. Neither requires baking – just dissolving in warm liquid and allowing the mixture to set in the refrigerator.
Instant pudding mix deserves a mention too. While purists might scoff, instant pudding creates reliable, quick results. Mix it with cold milk, let it set for five minutes, and you have a dessert base that you can layer, pipe, or serve as-is. It’s not cheating – it’s being efficient.
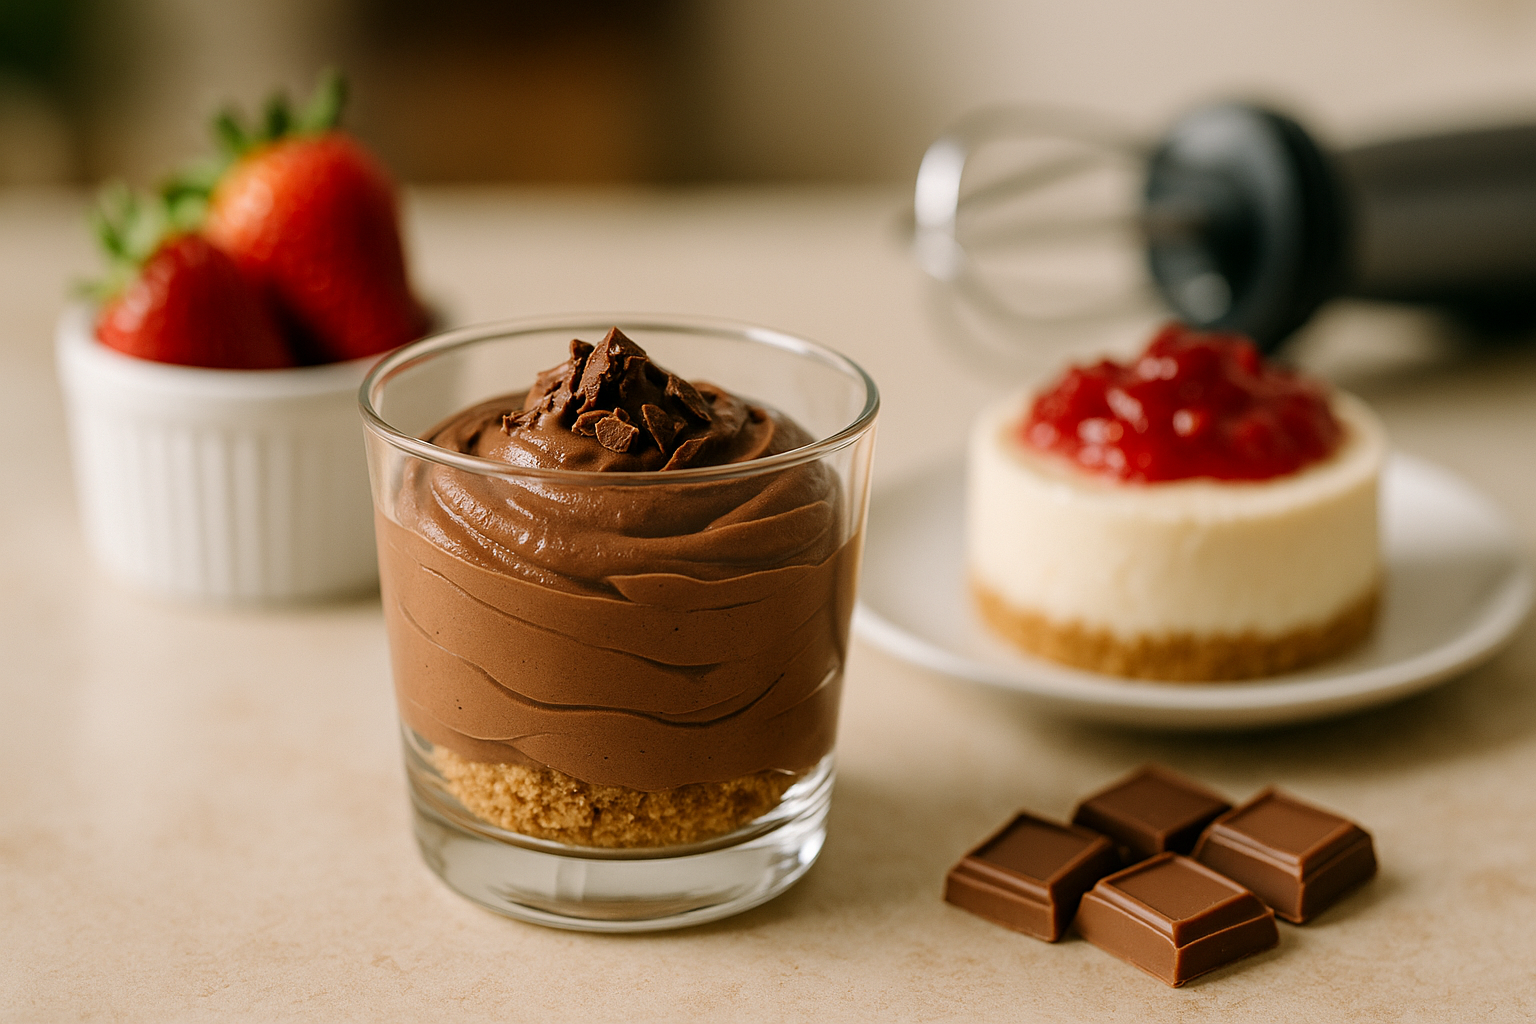
Five-Minute Chocolate Mousse
Traditional chocolate mousse involves tempering chocolate, separating eggs, and carefully folding components together. The no-oven version skips all that fuss. All you need is heavy cream, chocolate chips, and a microwave or small saucepan.
Start by heating about one-third of your heavy cream until it’s steaming but not boiling. Pour it over chocolate chips and let them sit for a minute. The heat melts the chocolate without any stirring required initially. After a minute, whisk until smooth. This creates a ganache base that’s already dessert-worthy on its own.
Here’s where the magic happens. Whip the remaining cold heavy cream until it forms soft peaks. Take a scoop of the whipped cream and stir it into the chocolate ganache to lighten it. Then gently fold in the rest of the whipped cream. You want to maintain as much airiness as possible – that’s what makes mousse light and ethereal.
Spoon the mousse into serving glasses and refrigerate for at least 30 minutes. If you can’t wait that long, it’s still delicious slightly soft. Top with additional whipped cream, chocolate shavings, or fresh berries. The entire process from start to finish takes less time than deciding what to watch on television.
The ratios are forgiving too. More chocolate creates a denser, fudgier mousse. More whipped cream makes it lighter and airier. You can’t really mess this up, which makes it perfect for last-minute dinner party desserts.
No-Bake Cheesecake Variations
No-bake cheesecake might be the ultimate example of a dessert that’s actually better without the oven. Traditional baked cheesecake requires water baths, precise temperatures, and the ever-present risk of cracks forming on top. The no-bake version eliminates all these headaches.
The foundation is simple: cream cheese, powdered sugar, and whipped cream or whipped topping. Beat the cream cheese until it’s completely smooth – this is crucial because lumps won’t disappear later. Add powdered sugar and vanilla extract, then fold in whipped cream. Pour this mixture over a graham cracker crust and refrigerate for at least four hours.
What makes no-bake cheesecake versatile is how easily you can customize it. Simple no-bake dessert variations show how swapping ingredients creates entirely different desserts. Swap vanilla for lemon juice and zest for lemon cheesecake. Fold in peanut butter for a rich, nutty version. Mix in melted chocolate for chocolate cheesecake.
The crust offers customization opportunities too. Graham crackers are classic, but crushed Oreos create a cookies-and-cream experience. Crushed pretzels add salty contrast. Vanilla wafers, gingersnaps, or even crushed nuts work beautifully. Just mix your crushed base with melted butter until it resembles wet sand, press it into your pan, and chill while you prepare the filling.
Individual servings make no-bake cheesecake even more appealing. Use mason jars or small glasses to create layered desserts with alternating crust and filling. These look impressive, portion control is built in, and guests can grab their own serving without anyone needing to slice and plate.
Toppings That Transform
A plain no-bake cheesecake is delicious, but toppings take it from good to memorable. Fresh fruit compote takes five minutes – just simmer berries with a bit of sugar until they break down and thicken slightly. Chocolate ganache creates an elegant finish. Caramel sauce, whether homemade or store-bought, adds sophistication. Even a simple dusting of cocoa powder or a handful of fresh berries elevates the presentation.
Energy Balls and No-Bake Cookies
When you want something sweet but don’t want a whole dessert production, energy balls and no-bake cookies deliver. These treats come together in one bowl with minimal effort, and most don’t even require refrigeration to set, though they taste better cold.
Classic no-bake cookies combine oats, cocoa powder, peanut butter, and sugar in a saucepan. Bring the mixture to a boil, let it boil for exactly one minute, then remove from heat and stir in vanilla. Drop spoonfuls onto wax paper and let them set. The entire process takes maybe 10 minutes, and you end up with dozens of cookies.
Energy balls take the concept in a healthier direction. Dates provide natural sweetness and act as a binder when processed in a food processor. Add nuts, cocoa powder, coconut, or whatever flavors appeal to you. Process until the mixture sticks together, roll into balls, and you’re done. These keep for weeks in the refrigerator and make excellent grab-and-go snacks.
The beauty of both options is their flexibility. You can make them as sweet or as healthy as you want. Use honey instead of sugar, add protein powder for extra nutrition, include seeds for crunch, or keep them dessert-focused with chocolate chips and peanut butter. Similar to quick meal preparations, these treats prove that speed doesn’t mean sacrificing quality or customization.
Icebox Cakes and Layered Desserts
Icebox cakes are retro desserts that deserve a comeback. The concept is brilliantly simple: layer cookies or graham crackers with whipped cream, refrigerate overnight, and the cookies soften into cake-like layers. It sounds too easy to be good, but the results are genuinely impressive.
Start with chocolate wafer cookies – the thin, crispy kind. Whip heavy cream with a bit of sugar and vanilla until it forms stiff peaks. Spread a thin layer of whipped cream on a serving plate, then arrange cookies in a single layer. Top with more whipped cream, add another layer of cookies, and repeat until you’ve built a stack. Cover the entire thing with the remaining whipped cream and refrigerate overnight.
By morning, the cookies have absorbed moisture from the cream and transformed into tender cake layers. Slice it like you would a traditional layer cake. The contrast between the chocolate layers and vanilla cream is classic and satisfying.
Creative no-bake layering techniques show how this concept extends beyond cookies and cream. Layer pound cake pieces with pudding and fruit for a trifle-style dessert. Alternate ladyfinger cookies with coffee-soaked mascarpone for tiramisu. Use graham crackers with lemon curd and whipped cream for an instant lemon icebox cake.
The visual appeal of layered desserts in clear glass dishes is undeniable. Guests can see every beautiful layer, and the presentation requires zero special plating skills. Just assemble, chill, and serve straight from the dish.
Make-Ahead Advantages
Icebox cakes and layered desserts actually improve with time, making them perfect for entertaining. Prepare them the day before your event, and you’ll have one less thing to worry about when guests arrive. The flavors meld together, and the textures soften and mingle. It’s one of the few desserts where procrastination isn’t an option – you must make it ahead.
Pudding-Based Quick Desserts
Instant pudding gets a bad reputation in foodie circles, but it’s an incredibly useful tool for quick desserts. Beyond just eating pudding from a bowl, it serves as a foundation for numerous no-oven treats that taste far more sophisticated than their simple preparation suggests.
Dirt cups bring childhood nostalgia with minimal effort. Make chocolate pudding according to package directions, let it set for five minutes, then layer it in clear cups with crushed Oreos. Top with more crushed Oreos and gummy worms if you’re feeling playful. Kids love these, but adults appreciate them too, especially at casual gatherings.
Pudding pies take the concept upscale. Pour prepared pudding into a graham cracker or cookie crust, top with whipped cream, and refrigerate. In less than 15 minutes of work, you have a dessert that looks bakery-quality. Banana pudding pie, chocolate cream pie, and butterscotch pie all follow this basic template.
Layered pudding parfaits work for any occasion. Alternate pudding with whipped cream, cake pieces, or cookies in glasses for an elegant presentation. The layers create visual interest, and using different pudding flavors in alternating layers adds complexity. A layer of chocolate pudding, then vanilla, then whipped cream, then crushed cookies creates textural and flavor contrast in every spoonful.
You can even make pudding from scratch in about the same time as instant if you want complete control over ingredients. Heat milk with sugar and cornstarch, whisk constantly until it thickens, then remove from heat and add flavoring. Pour into serving dishes and chill. The active cooking time is maybe five minutes, and the result is noticeably richer than instant versions.
Simple Frozen Treats Without an Ice Cream Maker
You don’t need specialized equipment to make frozen desserts. Your freezer and a few basic ingredients can produce treats that rival anything from an ice cream shop, and the preparation time is minimal.
Two-ingredient ice cream has taken the internet by storm for good reason – it actually works. Freeze bananas until solid, then blend them in a food processor until smooth and creamy. The texture is remarkably similar to soft-serve ice cream, and the flavor is naturally sweet. Add cocoa powder for chocolate banana ice cream, peanut butter for a richer version, or berries for fruit-flavored variations.
For those who want traditional ice cream without a machine, sweetened condensed milk is your secret weapon. Whip heavy cream to stiff peaks, fold in sweetened condensed milk and vanilla, pour into a container, and freeze. The condensed milk prevents ice crystals from forming, giving you smooth, scoopable ice cream without any churning required.
Frozen yogurt bark makes an excellent lighter option. Spread thick Greek yogurt on a baking sheet, top with fruit, nuts, chocolate chips, or granola, and freeze until solid. Break it into pieces and store in the freezer. It’s refreshing, relatively healthy, and feels special despite requiring about three minutes of effort.
Popsicles and ice pops are obvious no-oven desserts, but they’re worth mentioning because they’re so customizable. Blend fruit with yogurt or juice, pour into molds, and freeze. Layer different flavors for striped popsicles. Add chunks of fruit or chocolate chips for texture. The possibilities are limited only by your imagination and what’s in your kitchen.
Quick Tips for No-Oven Dessert Success
A few techniques separate good no-oven desserts from great ones. First, temperature matters. When recipes call for cold cream, they mean cold – straight from the refrigerator. Warm cream won’t whip properly. Similarly, if you’re making anything with chocolate, let melted chocolate cool slightly before adding it to whipped cream or other cold ingredients, or you’ll deflate everything.
Proper chilling time isn’t optional for most recipes. Yes, you can technically eat no-bake cheesecake after two hours in the refrigerator, but it won’t slice cleanly and the texture won’t be quite right. Patience pays off with these desserts – the fridge does important work.
Quality ingredients show through more in no-bake desserts than in baked ones. You’re not masking flavors with heat and caramelization, so use real vanilla extract, quality chocolate, and fresh cream. The difference is noticeable.
Don’t skip the crust-chilling step when making no-bake pies and cheesecakes. Pressing the crust into the pan and immediately adding filling leads to a soggy, unstable base. Chill the crust for at least 15 minutes before adding filling, and you’ll have a much better result.
Finally, remember that no-oven desserts often taste better the next day. Flavors meld, textures set properly, and everything comes together. If you’re making something for guests, prepare it the day before. You’ll reduce your stress and serve a better dessert.
No-oven desserts prove that creating something sweet and satisfying doesn’t require hours of work or specialized baking skills. With a few key ingredients and simple techniques, you can produce impressive treats in the time it would take just to preheat an oven. Whether you’re craving chocolate mousse on a Tuesday night or need to bring dessert to a gathering tomorrow, these quick preparations deliver results that taste anything but rushed. Stock your pantry with the essentials, keep heavy cream in your refrigerator, and you’ll always be minutes away from something sweet.
Leave a Reply